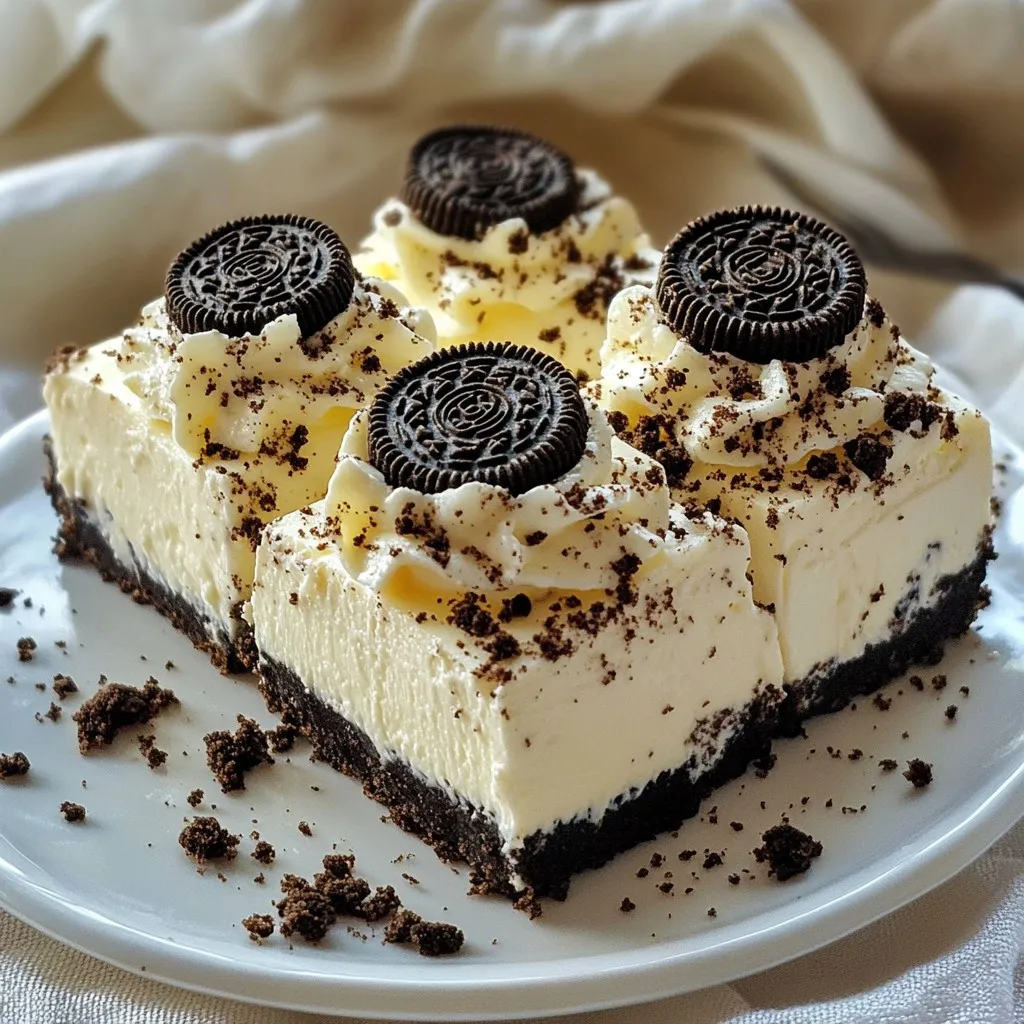
Craving a sweet treat without turning on the oven? I’ve got the perfect solution for you! These No-Bake Oreo Cheesecake Bars are simple to make and oh-so-delicious. With just a few ingredients, you can whip up a creamy, dreamy dessert that will impress friends and family. Let’s dive into the easy steps and get started on this delightful treat!
Why I Love This Recipe
- Easy to Make: This no-bake recipe requires minimal effort and time, perfect for a quick dessert fix.
- Rich and Creamy: The combination of cream cheese and whipped cream creates a luscious texture that melts in your mouth.
- Oreo Lovers Delight: Packed with crushed Oreos, every bite is a delightful chocolatey experience.
- Perfect for Any Occasion: These cheesecake bars are great for parties, gatherings, or just a sweet treat at home.
Ingredients
Here’s what you need to make these No-Bake Oreo Cheesecake Bars. Having the right ingredients makes all the difference.
List of Ingredients
– 24 Oreo cookies (plus extra for topping)
– 5 tablespoons unsalted butter, melted
– 16 oz cream cheese, softened
– 1 cup powdered sugar
– 1 teaspoon vanilla extract
– 1 cup heavy cream
– 1/4 cup crushed Oreo cookies (for filling)
These ingredients create a rich and creamy filling that pairs perfectly with the crispy crust. The Oreos are the star here, giving a chocolate flavor that everyone loves. You can use more Oreos on top for extra crunch and fun.
Make sure to get good quality cream cheese. It makes the filling smooth and tasty. The heavy cream must be cold for the best results when you whip it. This recipe is great because it uses simple items that you can find at any store.
With these ingredients, you can create a dessert that impresses your friends and family. Trust me, they will love these bars!
Step-by-Step Instructions
Preparing the Crust
1. Start by crushing the 24 Oreo cookies into fine crumbs. You can use a food processor or a plastic bag and a rolling pin.
2. Next, mix the cookie crumbs with 5 tablespoons of melted butter. Stir until all the crumbs are moistened.
3. Line an 8×8 inch baking pan with parchment paper. Press the crumb mixture firmly into the bottom of the pan. Use your fingers or the back of a spoon to spread it evenly.
4. Chill the crust in the refrigerator for about 15 minutes. This step helps it set nicely.
Making the Cheesecake Filling
1. In a large mixing bowl, beat 16 oz of softened cream cheese with an electric mixer. Mix until it is creamy and smooth.
2. Gradually add 1 cup of powdered sugar and 1 teaspoon of vanilla extract. Mix well until everything is combined and smooth.
Whipping the Cream and Combining
1. In another bowl, whip 1 cup of heavy cream until stiff peaks form. This step adds lightness to the filling.
2. Gently fold the whipped cream into the cream cheese mixture. Use a spatula to combine them without losing air.
3. Finally, fold in 1/4 cup of crushed Oreo cookies. This adds extra flavor and texture to your filling.
Chilling and Serving the Dessert
1. Pour the cheesecake filling over the chilled crust. Use a spatula to smooth it out evenly.
2. Cover the pan with plastic wrap and refrigerate for at least 4 hours. This will help the cheesecake firm up.
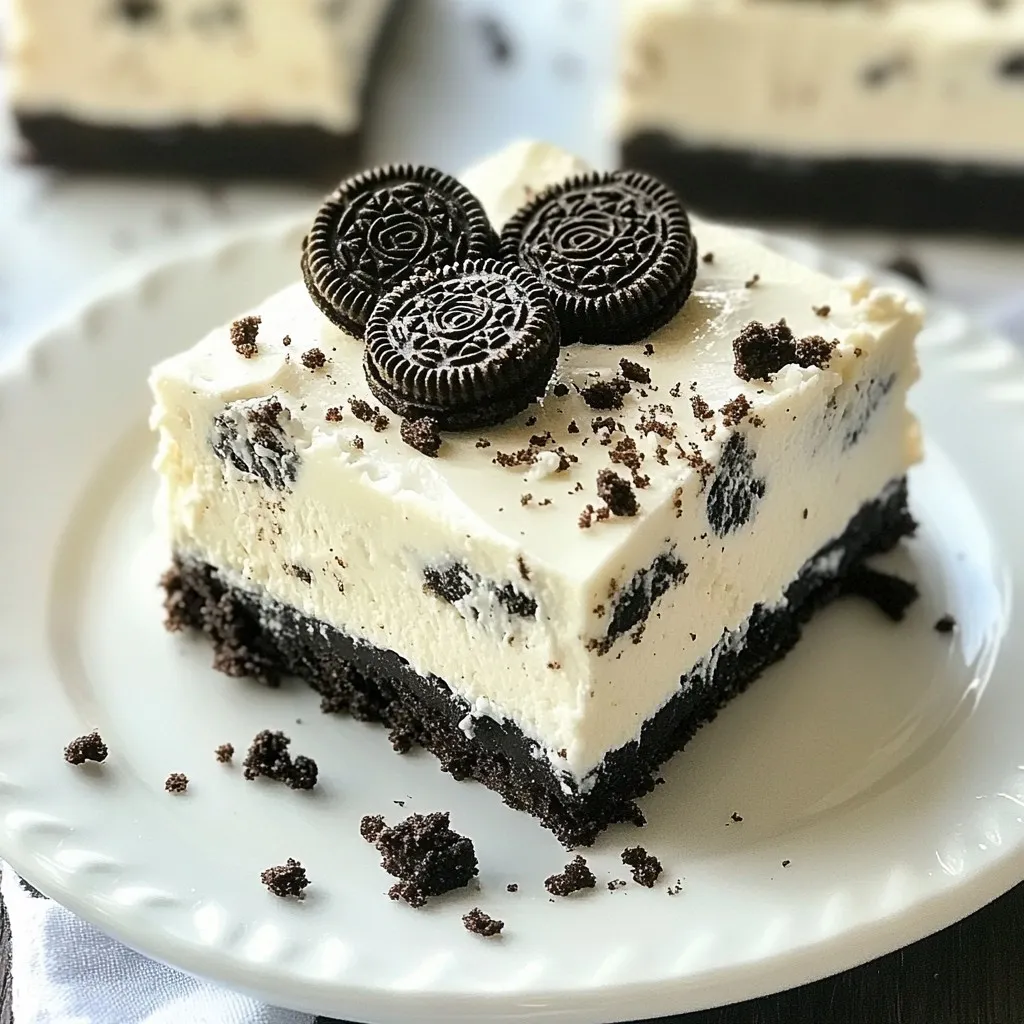
3. Once set, lift the cheesecake out of the pan using the parchment paper. Cut it into bars and garnish with extra crushed Oreos on top.
Tips & Tricks
Perfecting the Crust
To make the crust just right, ensure the cookie mixture is fully moistened. When you mix the crushed Oreo cookies with melted butter, all crumbs should stick together. If you see dry bits, add a touch more butter. Press the crust firmly into the pan. Use the back of a spoon or your fingers. This helps create a solid base for your cheesecake.
Achieving the Best Cheesecake Texture
Whipping the cream to stiff peaks is key for a light texture. Start with cold heavy cream in a chilled bowl. Beat until the cream stands tall without drooping. This step adds air to your filling. Next, gently fold the whipped cream into the cream cheese mix. Use a spatula and a gentle motion. This keeps the mixture airy and fluffy.
Serving Suggestions
Presentation matters! Cut the bars into neat squares for a clean look. Arrange them on a pretty platter. For a fun touch, drizzle chocolate sauce on top. You can also sprinkle extra crushed Oreos for added crunch. Serve these bars chilled. They taste best when they are cold and firm.
Pro Tips
- Chill Your Tools: For a smoother cheesecake filling, chill your mixing bowl and beaters before whipping the cream. This helps achieve stiff peaks more easily.
- Use Room Temperature Ingredients: Ensure your cream cheese is at room temperature before mixing. This prevents lumps in your filling and allows for a creamy texture.
- Don’t Skimp on Chilling Time: Allow the cheesecake to chill for the full 4 hours, or overnight if possible. This ensures that it sets properly and holds its shape when cut.
- Decorate with Flair: For an added touch, drizzle melted chocolate or caramel sauce over the bars before serving. This enhances the presentation and flavor.
Variations
Flavor Variations
You can play with flavors in many fun ways. Start by choosing different cookies for the crust. Mint Oreos give a cool twist. Peanut butter Oreos add a rich taste. Both options work well. You can also mix in chocolate chips or fruits like strawberries or raspberries. These add bursts of flavor.
Another great idea is to layer flavors. Try a chocolate layer with crushed Oreos, then a vanilla layer. Each bite can surprise you with new tastes.
Dietary Substitutions
If you need a gluten-free version, swap regular Oreos for gluten-free cookies. Many brands offer tasty options. Make sure to check the labels for gluten-free status.
For a dairy-free treat, use vegan cream cheese instead of regular cream cheese. Coconut cream can replace heavy cream. This keeps the creamy texture without dairy. Both options are easy to find in stores. They make the dessert just as delicious!
Storage Info
Storing Leftovers
To keep your cheesecake bars fresh, store them in an airtight container. Place parchment paper between layers to prevent sticking. It helps maintain the texture. You can refrigerate the bars for up to five days. After that, they may lose their quality and flavor.
Freezing Instructions
You can freeze the cheesecake bars for longer storage. First, cut them into individual bars. Wrap each bar tightly in plastic wrap. Then, place them in a freezer-safe bag or container. They will stay fresh for up to three months in the freezer.
When you are ready to enjoy them, take out the bars and place them in the fridge. Let them thaw for several hours before serving. This helps preserve the creamy texture. Enjoy your delightful treat!
FAQs
Can I use regular cream cheese instead of low-fat?
Yes, you can use regular cream cheese. It will make the bars richer. Low-fat cream cheese works too. It gives a lighter taste. Both options blend well with sugar and vanilla.
How long do No-Bake Oreo Cheesecake Bars last in the fridge?
These bars last about 5 days in the fridge. Keep them in an airtight container. This helps keep them fresh and tasty. After a few days, the texture may change. They still taste great even after some time.
Can I make these bars ahead of time?
Absolutely! You can make these bars a day or two ahead. Just store them in the fridge. This gives the flavors time to blend. Be sure to cover them well. This keeps them from drying out. Enjoy them chilled for the best taste!
You now know how to make tasty No-Bake Oreo Cheesecake Bars. We covered the key ingredients, from Oreo cookies to cream cheese. I shared simple steps for the crust, the filling, and tips for chilling. You can even try fun flavor twists and see how to store leftovers. Remember, precise mixing and a little patience lead to great results. Enjoy sharing these delicious bars with friends and famil