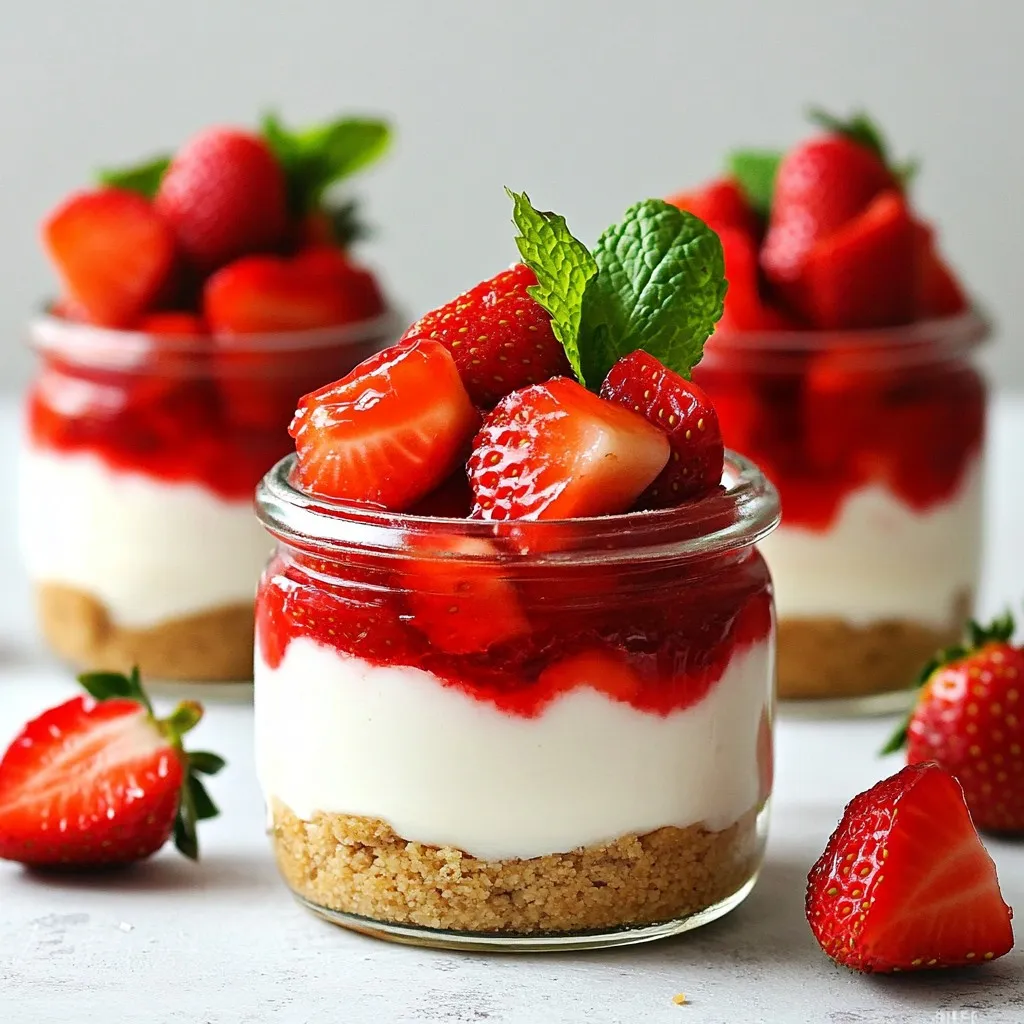
Looking for an easy, tasty dessert? You’re in the right spot! No-bake strawberry cheesecake jars are simple to make and perfect for any occasion. With a creamy filling, sweet strawberries, and a crunchy crust, they’re a treat anyone can love. Follow me as I guide you through the process step-by-step, so you can impress your family and friends with this delightful dessert. Let’s get started on your new favorite recipe!
Why I Love This Recipe
- Easy to Assemble: This no-bake cheesecake requires minimal effort, making it a perfect dessert for any occasion.
- Fresh Ingredients: The use of fresh strawberries elevates the flavor, providing a delightful taste of summer.
- Customizable: You can easily modify the recipe by adding different fruits or flavors to suit your preferences.
- Impressive Presentation: Serving in jars adds a charming touch, making it a visually appealing dessert for gatherings.
Ingredients
List of Ingredients
– 1 cup graham cracker crumbs
– 2 tablespoons unsalted butter, melted
– 1 cup cream cheese, softened
– 1/2 cup powdered sugar
– 1 teaspoon vanilla extract
– 1 cup heavy whipping cream
– 1 1/2 cups fresh strawberries, diced (reserve some for topping)
– 1 tablespoon lemon juice
– Fresh mint leaves for garnish
Special Notes on Ingredients
For the crust, use plain graham crackers. If you want, try other cookies like digestive biscuits. The butter must be melted to help the crumbs stick together. Use fresh cream cheese for a smooth filling. Make sure it’s soft to blend well. The heavy cream should be cold. Cold cream whips better and gives a fluffier texture. Fresh strawberries add natural sweetness and color. You can adjust lemon juice to enhance the fruit flavor.
Recommended Tools and Equipment
You need a mixing bowl for the crust and filling. A hand mixer or stand mixer helps beat the cream cheese. Another bowl is needed for whipping the cream. Small jars or dessert cups work best for serving. A spatula is handy for folding in the whipped cream. Finally, keep plastic wrap or jar lids ready for chilling your jars.

Step-by-Step Instructions
Preparing the Graham Cracker Crust
To make the graham cracker crust, start with 1 cup of graham cracker crumbs. I find it easiest to crush the crackers in a plastic bag. Pour the crumbs into a mixing bowl. Then, melt 2 tablespoons of unsalted butter. Add the melted butter to the crumbs. Stir the mixture until it looks like wet sand. Now, take small jars or dessert cups. Add about 2 tablespoons of this mixture to the bottom of each jar. Press down gently to pack it tight. Set the jars aside for later.
Making the Cheesecake Filling
Next, we need to make the cheesecake filling. Grab a large bowl and add 1 cup of softened cream cheese. Then, add 1/2 cup of powdered sugar and 1 teaspoon of vanilla extract. Beat these together until the mixture is smooth and creamy. In another bowl, pour in 1 cup of heavy whipping cream. Whip the cream until you see soft peaks form. Slowly fold the whipped cream into the cream cheese mixture. This helps keep the filling light and airy. Finally, add 1 1/2 cups of diced fresh strawberries and 1 tablespoon of lemon juice. Gently fold these in for extra flavor.
Assembling the Jars
Now it’s time to layer the jars. Take the cheesecake filling and spoon or pipe it on top of the graham cracker crust in each jar. Fill them generously to make each bite tasty. After you fill the jars, cover them with lids or plastic wrap. Chill the jars in the fridge for at least 4 hours. For the best taste, chill them overnight. Before serving, top each jar with more diced strawberries and a fresh mint leaf. This adds a nice touch and looks great!
Tips & Tricks
Tips for the Perfect Cheesecake Texture
To get a smooth texture, use softened cream cheese. Cold cream cheese will not mix well. Beat the cream cheese and sugar until fluffy. This helps avoid lumps. When you fold in the whipped cream, do it gently. This keeps your cheesecake light and airy.
How to Whip Cream Properly
Chill your bowl and beaters before whipping cream. Cold tools work best for whipping. Start beating on low speed and then increase it. Stop when soft peaks form. Over-whipping makes the cream grainy. Fold it into the cheesecake mix gently. This keeps the air in, which is key for that perfect texture.
Suggestions for Flavor Enhancements
You can add a touch of lemon zest for extra brightness. A splash of almond extract gives a lovely flavor twist. For a berry mix, try raspberries or blueberries. You can even add a layer of chocolate sauce for a fun surprise. Use fresh herbs like basil or mint for a unique taste. Each option adds a fun twist to your no-bake strawberry cheesecake jars!
Pro Tips
- Use Cold Ingredients: Ensure your cream cheese and heavy cream are cold for better whipping and texture.
- Customize Your Fruit: Feel free to mix in other fruits like blueberries or raspberries for a unique twist.
- Chill Longer: For the best texture and flavor, chill the jars overnight before serving.
- Garnish Creatively: Add a drizzle of strawberry sauce or chocolate on top for an extra touch of sweetness.
Variations
Alternative Fruit Options
You can change the fruit to make this dessert your own. Try using blueberries, raspberries, or blackberries. These fruits offer a nice twist on the flavor. For a tropical vibe, mango or pineapple works well too. Just remember to adjust the sugar based on the fruit’s sweetness. Mixing fruits can also create fun and colorful layers.
Different Flavored Cheesecake Variants
If you want to switch up the cheesecake flavor, think about adding chocolate or peanut butter. To make a chocolate cheesecake, mix in cocoa powder or melted chocolate with the cream cheese. For peanut butter, simply fold in your favorite creamy peanut butter. Both options add a rich taste that pairs well with the fruit. You can also try adding a hint of almond extract for a nutty twist.
Gluten-Free and Vegan Adaptations
Making this dessert gluten-free is easy. Swap the graham crackers with gluten-free cookies or crushed nuts. For a vegan version, use dairy-free cream cheese and coconut cream instead of heavy cream. You can also use maple syrup or agave nectar instead of powdered sugar. These small swaps let everyone enjoy this treat, no matter their diet.
Storage Info
Best Practices for Storing Cheesecake Jars
To keep your no-bake strawberry cheesecake jars fresh, store them in the fridge. Use tight lids or plastic wrap to cover each jar. This keeps air out and helps maintain their creamy texture. Make sure they sit on a flat shelf. If they are too high, they can fall over.
Shelf Life and Freezing Tips
These cheesecake jars last about 3 to 5 days in the fridge. If you want to keep them longer, you can freeze them. Just make sure to use freezer-safe jars. They can stay in the freezer for up to a month. When you are ready to eat, transfer them to the fridge overnight to thaw.
How to Refresh Leftovers
If your cheesecake jars look a bit sad after a few days, you can refresh them! Add a little whipped cream on top. This makes them look fresh and tasty again. You can also add more fresh strawberries or a mint leaf for color. A little zest of lemon juice can brighten the flavors too.
FAQs
Can I use a different type of crust?
Yes, you can! While I love the graham cracker crust, you can try other options. Use crushed cookies like Oreos or digestive biscuits for a tasty twist. You can also use a nut crust made from almonds or walnuts for a gluten-free choice. Each crust will give a unique flavor and texture to your cheesecake jars. Just make sure to mix your chosen crust with melted butter to hold it together.
How long does no-bake cheesecake last in the fridge?
No-bake cheesecake can last about 3 to 5 days in the fridge. Make sure to store it in airtight containers to keep it fresh. If you see any signs of spoilage, such as off smells or changes in texture, it’s best to toss it. You want to enjoy it while it’s still creamy and delicious!
Can I make this recipe ahead of time?
Absolutely! This no-bake strawberry cheesecake is perfect for meal prep. You can make it a day or two in advance. Just keep the jars in the fridge until you’re ready to serve. This gives the flavors time to set and blend, making each bite even tastier. Just remember to add the strawberry topping right before serving for the best look and taste.
This blog post covered how to make cheesecake jars with a tasty graham cracker crust. You learned about key ingredients, tools, and step-by-step instructions. We shared tips for perfect texture and creative variations. Finally, we discussed the best ways to store your cheesecake.
In summary, these jars are fun, easy, and versatile. Enjoy experimenting with different flavors and storing your treats. Happy bakin