Are you ready to impress your friends with a sweet and easy treat? Today, I’ll show you how to make a delightful Oreo Cookie Icebox Cake. This classic dessert needs no baking and is perfect for any occasion. With just a few simple ingredients and easy steps, you will have a show-stopping cake chilled and ready to enjoy. Let’s dive into this tasty recipe that you’ll want to make over and over again!
Why I Love This Recipe
- Easy to Prepare: This icebox cake requires minimal cooking, making it perfect for beginners and busy cooks alike.
- No Baking Required: Enjoy a delicious dessert without turning on the oven, which is especially great in warm weather.
- Layered Delight: The combination of creamy whipped cream and crunchy Oreos creates a delightful texture in every bite.
- Customizable: Feel free to add your favorite toppings or mix-ins, such as fruit or different types of cookies, to make it your own!
Ingredients
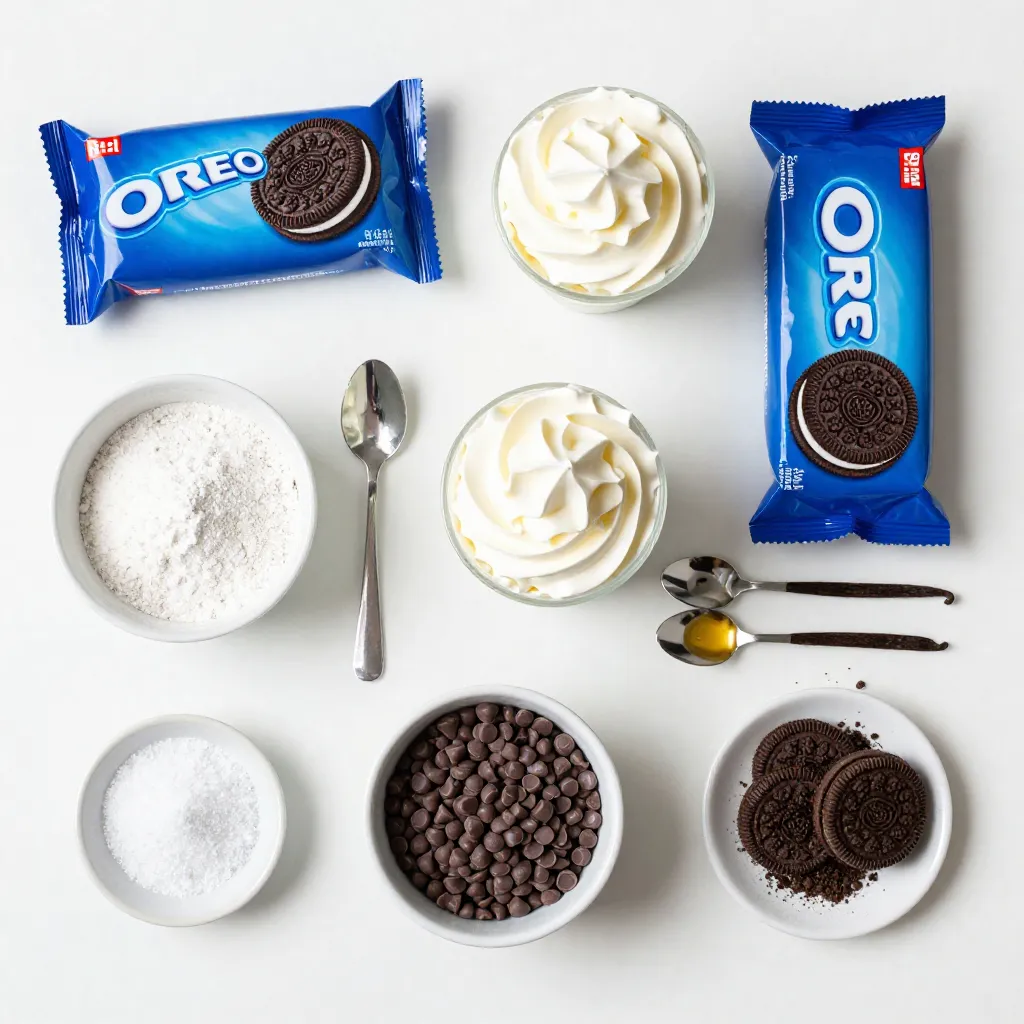
List of Ingredients
– 2 packs of Oreo cookies (original)
– 2 cups heavy whipping cream
– 1 cup powdered sugar
– 2 teaspoons vanilla extract
– A pinch of salt
– 1 cup mini chocolate chips (optional)
– Crushed Oreos, for topping
Measurement Notes
When measuring, use dry measuring cups for sugar. For liquids, use a liquid measuring cup. This ensures accuracy. If you want a sweeter cake, add more powdered sugar. For a lighter texture, whip the cream until stiff peaks form. This will give your cake nice layers.
Ingredient Substitutions
You can use different cookies if you want. Try chocolate or vanilla wafers for a twist. If you need a dairy-free option, use coconut cream instead of heavy cream. For sweetness, maple syrup works well in place of powdered sugar. Just remember, each swap can change the taste and texture. Adjust as needed for your perfect cake!
Step-by-Step Instructions
Preparing the Whipped Cream
To start, grab a large mixing bowl. Combine 2 cups of heavy whipping cream, 1 cup of powdered sugar, 2 teaspoons of vanilla extract, and a pinch of salt. This mix is what makes the cake creamy and sweet. Use an electric mixer on medium-high speed. Whip the mix until you see stiff peaks. This step takes about 3 to 5 minutes. The peaks should hold well when you lift the mixer.
Layering the Cake
Next, take a rectangular baking dish that is 9×13 inches. Spread a thin layer of the whipped cream at the bottom. Now, dip an Oreo cookie briefly in milk. If you like a crunchier texture, skip the milk. Lay the cookie flat on the whipped cream. Keep repeating this step until you cover the bottom.
Once you have the first layer of cookies, add another layer of whipped cream on top. If you want, sprinkle some mini chocolate chips over the cream for extra flavor. Continue to layer by alternating cookies and whipped cream. Keep going until you run out of ingredients. Finish with a layer of whipped cream on top. Crumble some Oreos over the last layer for a nice touch.
Refrigeration and Setting
Cover your icebox cake with plastic wrap. Place it in the fridge for at least 4 hours. For best results, let it set overnight. This waiting time helps all the flavors blend together. When you are ready to serve, slice the cake into squares. Each bite will be a mix of creamy and crunchy goodness!
Tips & Tricks
Secrets to Perfect Whipped Cream
To make great whipped cream, start with cold ingredients. Cold cream whips better. Use heavy whipping cream for the best results. Combine it with powdered sugar, vanilla extract, and a pinch of salt. Whip on medium-high speed until you see stiff peaks. This usually takes about 3 to 5 minutes. Stiff peaks mean the cream holds its shape well. If you want a sweeter taste, add more powdered sugar.
Best Practices for Layering
Layering is key to a great Oreo cookie icebox cake. Start by spreading a thin layer of whipped cream at the bottom of your dish. Dip each Oreo cookie in milk briefly, or leave them dry. Dipping gives a softer cookie, while a dry cookie stays crunchy. Lay the dipped or dry cookies flat on the cream. Alternate layers of cookies and whipped cream. Make sure to finish with whipped cream on top. This keeps the cookies from getting too soggy.
Serving Suggestions
When your cake is ready, slice it into squares. Serve it chilled for a refreshing treat. Top each slice with extra crushed Oreos for decor. You can also sprinkle mini chocolate chips on top for added fun. Pair it with fresh berries for a burst of flavor. This cake is perfect for parties or family gatherings. Enjoy the mix of creamy and crunchy in every bite!
Pro Tips
- Chill Your Tools: For the best whipped cream texture, chill your mixing bowl and beaters in the refrigerator for about 15 minutes prior to whipping.
- Use Whole Oreos: For a richer flavor, avoid breaking the Oreos; use them whole in each layer to maintain their structure and enhance the cake’s presentation.
- Experiment with Flavors: Add a splash of coffee or mint extract to the whipped cream for an exciting twist on the classic flavor profile.
- Let It Set: For optimal flavor and texture, allow the cake to set in the refrigerator overnight; this will ensure the layers meld beautifully.
Variations
Additions for Different Flavor Profiles
You can change the flavors of your Oreo Cookie Icebox Cake. Try adding different cookies or toppings. For a mint twist, use mint Oreos instead of regular ones. You can add a layer of peanut butter or Nutella for a rich taste. For a fruity flair, mix in fresh berries between the layers. You can also add a splash of coffee to the whipped cream for a mocha flavor. These little changes can make your cake unique and fun.
Gluten-Free Options
If you need a gluten-free version, don’t worry! You can use gluten-free Oreo cookies, which are just as tasty. The rest of the recipe stays the same. Make sure to check all other ingredients too. Some brands may add gluten, so read the labels carefully. This way, everyone can enjoy this delicious treat.
Seasonal Variations
You can also make your icebox cake fit the season. In the summer, add fresh strawberries or peaches. These fruits add a burst of flavor and color. For fall, try adding pumpkin spice to the whipped cream. You can even use crushed candy canes for a festive touch during the winter holidays. Each season brings new flavors to explore, making this cake fun all year round!
Storage Info
How to Store Leftovers
To store any leftover Oreo cookie icebox cake, cover it tightly with plastic wrap. You can also use an airtight container. This keeps the cake fresh and prevents it from absorbing other smells in the fridge. Place it in the fridge for best results. Leftovers taste great for up to 3 days.
Freezing Instructions
You can freeze the Oreo cookie icebox cake if you have extra. First, cut it into squares. Wrap each square in plastic wrap. Then place them in a freezer bag. Make sure to remove as much air as possible. This helps prevent freezer burn. You can freeze it for up to 2 months. When ready to eat, thaw it in the fridge overnight.
Shelf Life Considerations
The shelf life of this icebox cake mainly depends on the whipped cream. If you store it well, it lasts about 3 days in the fridge. After freezing, it stays safe for up to 2 months. However, for the best taste, enjoy it fresh. The flavors and textures are best right after making it.
FAQs
Can I use other cookies instead of Oreos?
Yes, you can use other cookies. Try chocolate wafers or graham crackers for a twist. Just remember, different cookies change the taste. Choose cookies you love. They can add fun flavors to your icebox cake.
How long can I keep the icebox cake in the fridge?
You can keep your icebox cake in the fridge for up to five days. Cover it well with plastic wrap, so it stays fresh. The longer it sits, the better the flavors blend. Just make sure to check for any changes before serving.
What can I substitute for heavy whipping cream?
If you need a substitute for heavy whipping cream, try using coconut cream. It has a rich texture and adds a nice flavor. You can also use whole milk mixed with butter. This mix will give a creamy feel, but it may not whip as well.
You now have all the ingredients and steps needed to make a tasty icebox cake. From preparing the whipped cream to layering the cake just right, each part counts. Remember to think about the substitutions and variations that fit your taste. Store any leftovers properly so you can enjoy them later. With all these tips, you can impress your family and friends with this easy treat. Happy bakin